" fill-opacity=".3" d="M0-111h1200v397s-252.211 51.289-538.449 54C375.312 342.711 0 292 0 292v-403Z"/%3E%3Cpath fill="url(%23b)" d="M1-114h1199v378s-252 51.289-538 54C376 320.711 0 270 0 270v-384Z"/%3E%3Cpath fill="url(%23c)" d="M0 60h1200v188s-327 63.289-613 66C301 316.711 0 273 0 273V60Z"/%3E%3Cpath fill="url(%23d)" d="M0 60h1200v188s-327 63.289-613 66C301 316.711 0 273 0 273V60Z"/%3E%3Cmask id="e" width="1201" height="255" x="-1" y="60" maskUnits="userSpaceOnUse" style="mask-type:alpha"%3E%3Cpath fill="%23EEF1F6" d="M0 60h1200v188s-327 63.289-613 66C301 316.711 0 273 0 273V60Z"/%3E%3C/mask%3E%3Cg mask="url(%23e)"%3E%3Cmask id="g" width="1438" height="328" x="-124" y="-13" maskUnits="userSpaceOnUse" style="mask-type:alpha"%3E%3Cpath fill="url(%23f)" fill-rule="evenodd" d="M-123.5 258.5-109-13h1395l27.5 245c-232.5 34.5-487.705 80.384-725.581 83-237.486-2.721-265.419-4-711.419-56.5Z" clip-rule="evenodd"/%3E%3C/mask%3E%3Cg mask="url(%23g)"%3E%3Cpath fill="%23FEF3C7" fill-opacity=".05" d="M774.502 1161.55c72.001-3.83 144.529-16.6 217.321-38.74C1514.56 964.017 1919.92 369.717 2099-392.74 1846.08 72.142 1341.28 313.096 774.502 323.314 207.726 312.671-296.808 72.141-549.998-392.74-370.919 369.717 34.449 964.017 557.181 1122.81c72.792 21.71 145.32 34.48 217.321 38.74Z"/%3E%3Cpath fill="%232070E8" fill-opacity=".25" d="M1243.34 184.225c102.44 30.548 204.48 74.055 305.68 131.036C2275.79 724.198 2778.24 1714.59 2935.35 2866.48 2634.05 2114.1 1943.59 1594 1134.58 1382.03 322.864 1199.88-429.69 1367.89-852 1944.02-497.039 916.86 159.636 208.787 927.603 163.907c106.887-5.677 212.247 1.329 315.737 20.318Z"/%3E%3Cpath fill="%23FEF3C7" fill-opacity=".05" d="M1232.5 70.76c104.07 5.535 208.91 23.986 314.13 55.967C2302.21 356.131 2888.15 1214.7 3147 2316.21 2781.41 1644.6 2051.75 1296.5 1232.5 1281.74 413.251 1297.12-316.027 1644.6-682.001 2316.21-423.151 1214.7 162.788 356.131 918.372 126.727 1023.59 95.361 1128.43 76.91 1232.5 70.76Z"/%3E%3Cpath fill="%23154A99" fill-opacity=".29" d="M421.155 420.269c113.733 46.994 226.413 108.503 337.53 185.053C1556.67 1154.75 2075.77 2329.98 2199.28 3644.03 1895.3 2761.18 1143.24 2091.29 243.733 1753.08c-903.919-305.05-1757.473-209.22-2258.663 386.12C-1568.66 1028.61-797.982 313.945 67.226 358.413c120.398 6.829 238.484 27.723 353.929 61.856Z"/%3E%3C/g%3E%3C/g%3E%3Cdefs%3E%3ClinearGradient id="a" x1="600" x2="600" y1="-92" y2="449" gradientUnits="userSpaceOnUse"%3E%3Cstop offset=".336" stop-color="%23007EE5"/%3E%3Cstop offset="1" stop-color="%2363D9EA"/%3E%3C/linearGradient%3E%3ClinearGradient id="b" x1="600.5" x2="600.5" y1="-114" y2="427" gradientUnits="userSpaceOnUse"%3E%3Cstop offset=".336" stop-color="%23007EE5"/%3E%3Cstop offset="1" stop-color="%2363D9EA"/%3E%3C/linearGradient%3E%3ClinearGradient id="c" x1="647" x2="647" y1="60" y2="319" gradientUnits="userSpaceOnUse"%3E%3Cstop offset=".052" stop-color="%23007EE5"/%3E%3Cstop offset=".514" stop-color="%231561D4"/%3E%3Cstop offset=".938" stop-color="%2300A0B5"/%3E%3C/linearGradient%3E%3ClinearGradient id="d" x1="647" x2="647" y1="60" y2="319" gradientUnits="userSpaceOnUse"%3E%3Cstop offset=".282" stop-color="%23007EE5" stop-opacity="0"/%3E%3Cstop offset=".822" stop-opacity=".3"/%3E%3C/linearGradient%3E%3ClinearGradient id="f" x1="588.5" x2="588.5" y1="-13" y2="499.532" gradientUnits="userSpaceOnUse"%3E%3Cstop stop-color="%23154A99"/%3E%3Cstop offset="1" stop-color="%2363D9EA"/%3E%3C/linearGradient%3E%3C/defs%3E%3C/svg%3E)

Photo by Goc/E+ via Getty Images
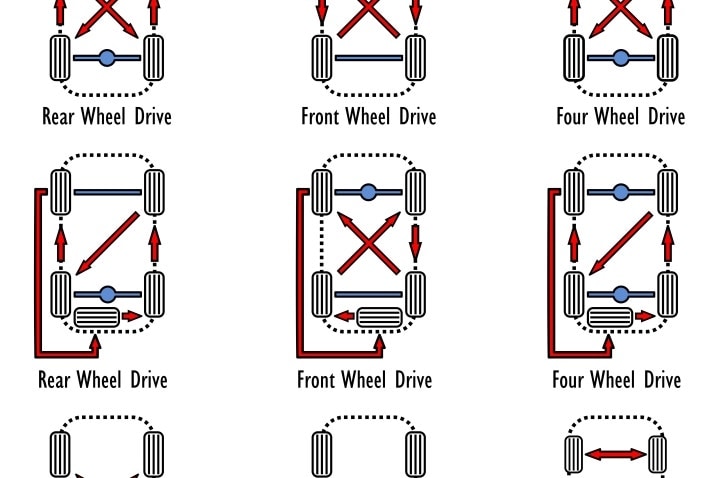
Tires are rotated in patterns, and determining which pattern you need to rotate them in will depend on the vehicle, its number of driven wheels (2WD, AWD, 4WD), and the size of each tire.
Your car’s tires wear down as they roll down the road. It takes time, but eventually you’ll need to replace them. It’s a costly aspect of car maintenance, costing drivers hundreds of dollars at a minimum. But there is a way to prolong the life of a set of tires, maintain optimal grip, and ensure that the tires wear down evenly. Better yet, it’s something even the most inexperienced at-home mechanics can do themselves.
How often should I rotate my tires?
How do I rotate my tires?
Common tire rotation patterns
Why do I need to rotate my tires?
How often should I rotate my tires?
You should rotate your tires at least once a year. Most tire manufacturers recommend rotating tires every 5,000 to 8,000 miles. Happily, this schedule often aligns with many service intervals. Some dealerships and mechanics will sometimes offer to perform the service for free.
If you rotate the tires yourself, you can simply use the tread left on individual tires to determine the best time to rotate them. Checking seasonally can be a great way to do this, or you can check when changing from a set of winter tires to summer rubber or vice versa. A simple tread-depth checker will display the amount of tire tread left in 32nds of an inch or millimeters, and knowing when to rotate the tires is as simple as determining which tires have less tread than others.
With that knowledge, let's move to the procedure, provided your car has four wheels with equal tire sizes and matching tread patterns.
How do I rotate my tires?
Tools needed: Performing a rotation at home will require basic tools like a jack, jack stands, wheel chocks, a torque wrench, and a socket wrench to remove the lug nuts. A torque wrench is an especially important tool for this procedure. It is necessary on cars with alloy wheels to avoid overtightening and damage to the wheels. The recommended torque specs can be found in your owner's manual or online. Torque wrenches range in price, but a simple one costs about $40.
Step 1: Park your car on level pavement. Put the car in park (or in gear if it's a manual transmission) and set the parking brake firmly. Turn off the engine.
Step 2: Block the tires. Choose which side of the car you want to work on first. Now, go to the opposite side and block the tires, front and rear, with a wheel chock. This precaution will prevent the car from moving while you work on it.
Step 3: Prepare to jack up the car. There are several kinds of jacks you can use to elevate the car. The most readily available may be the jack that came with the vehicle. However, this is also the most unsafe and should only be used for short periods of time. If you use this jack, we recommend safeguarding yourself by using jack stands under both the front and rear axles. Once the car is in the air, position the jack stands under the axle behind each wheel, then gently lower the weight of the vehicle onto the jack stands.
You can also use a small hydraulic jack or — the best of all possible options — a floor jack. Whichever one, the principle is the same. Locate a point under the frame nearest the manufacturer's recommended jacking point and position the jack on that spot. This will be a foot or two behind the front wheel in most front-engine vehicles. (There will sometimes be a hole facing you here, where you can insert the extension from the jack.)
Step 4: Loosen lug nuts. Before you elevate the vehicle, you will want to take the lug wrench and loosen the lug nuts on both the front and rear wheels. This technique uses the vehicle's weight to hold the wheels in place so they don't spin as you crank on the lug nuts.
Step 5: Jack up the car. Once the lug nuts are loose, jack up the vehicle and then, if you have jack stands, back down onto the stands. Spin off the lug nuts and put them in a safe place.
Step 6: Remove the tires. Remove the front tire, then the rear, and switch their positions, rolling the front tire to the rear and the rear to the front. Before you mount them, let's inspect the tread.
Step 7: Inspect the tire's tread. The tread pattern has wear indicators built into it. These are little bumps or nubs manufactured directly into the tread. Inspecting them will tell you how close the tire is to needing replacement. See if you can spot them. They're located throughout the tread pattern, but especially on the ridge where the tread and sidewall meet. Find one? Compare its height to the height of the tread surrounding it. If the tread is wearing to the point where its height is approaching that of the wear indicator, you'll need to be shopping for tires soon. Make a mental note.
Step 8: Mount the tires. Now go ahead and mount the tires, having switched front to rear, etc. If you have a friend handy, have your buddy hold the tire while you thread the first lug nut or two into its hole. Once all the nuts are threaded finger-tight, it's time to lower the vehicle back down.
Step 9: Lower the vehicle. Jack the vehicle up off the jack stands (if you're using them) and then slowly let it sink to the ground. Take the torque wrench and tighten the lug nuts to their recommended specification. It's best to work the lug nuts diagonally across from one another, as though forming a star, instead of side to side. This allows them to sit better into their cradles.
Step 10: Repeat on the other side. You're now done on this side. Now go to the other side of the car and repeat the steps.
Common tire rotation patterns
Most cars use four tires of equal size, but some performance cars will use a staggered tire size — a set of smaller tires is usually fitted to the front axle, with larger tires in the back providing improved grip. There are also directional and nondirectional tires — tires that must rotate in a specific direction and tires that can rotate in any direction, respectively. Several patterns can be used, depending on whether your car’s tires are uniform in size or nondirectional.